Saturday, May 7, 2011

My Final Project: Part VI

I'll let the picture speak for themselves. My first piece, of which I'm proud; a token of my learning:


My Final Project: Part V

Here is the blade in its final stage before hilting:


Here is one side carved with Ringerike-style Norse ornament and the finished bolster:


Here is the other side with a less abstract design:


The bolster looks beautiful thanks to file-work and 400 grit sandpaper!


Here she is, all assembled! The end bolster is buffed sheet copper held on by four brass tacks and a cold-peened tang!

My Final Project: Part IV

My camera battery was dead while I was making my handle, so I'll have to describe it. I found a great piece of tiger maple just the right size. I squared all the sides of it and marked the centers of the ends, and drilled a small hole all the way through it, from both ends. This was to be the pathway for my first attempt at burning a hole into the handle. The way this is done is heating the end of the blade's tang to a red heat, and forcing it through the pilot hole. Smoke comes out and it burns the shape of the tang, but it takes many, many heats, and one must be very careful to hold it perfectly straight or it may go off course. I think this may have happened to me, and it was a time-consuming and somewhat frustrating process, but I was pleased with the experience.


Next time, I know to make the tang more gradual in its taper, heat the blade up hotter, and drill a bigger hole, rather than make it too small like I did, which allowed for some wandering of the hot tang in the handle and a crack in the wood when I pushed it too far.

Next, I made the bronze bolster for the bottom (blade end) of the handle. I found a piece just the right size and drilled holes the size of the blade. I drilled much bigger holes on the back so the only sawing and filing I would have to do would be on a smaller thickness, and there would be more space for the glue to expand when I glued the bolster on. Here I am with the forever-breaking jeweler's saw:


Here is my bolster laid out:


After that was finished, I used my new knot-drawing and carving skills!


Maple is much nicer to carve than the walnut I've experience previously. It's harder, but far far less rippy, and could have looked extremely nice if I'd had the time with it. Unfortunately, I could only carve roughly and the finishing wasn't complete! It looks authentic though, if not the absolute best of my ability.

My Final Project: Part III

I was unable to take pictures of it, but the next step of the heat-treatment was tempering. Tempering is converting some or all of the rigid, brittle molecular structure of the hardened blade into another that is much more durable and flexible, but retains the hardness. This is achieved by heating the metal up again to another critical temperature, keeping it at that heat for an amount of time, and then cooling it very slowly to room temperature. The file I happened to have is most likely made out of 1075 carbon steel, and its critical temperature is somewhere around 475-500 degrees Fahrenheit. I wrapped it in tinfoil so it would heat evenly and stuck it in my dorm lounge oven for about an hour when the oven reached that heat. Then I turned the oven off and allowed it to cool completely. When I took the blade out, I could bend it both ways up to maybe 25 degrees and returned absolutely true. It was now a true blade.


The next step was making a tool with which to scrape the decorative grooves I wanted based on historical examples. I learned about this tool on Don Fogg's very helpful bladesmithing site, and I made my own version by drilling and tapping a hole to screw in a carbide lathe bit, welding on a stabilizer, and drilling holes for an adjustable fence, which I had to screw on using a square to make sure it was, you know, square.


Then I custom-cut a piece of wood to clamp the blade on, with one edge in the exact shape of the groove I wanted to score. I calculated the placement of the blade and began scraping!


It worked surprisingly fast! I had four grooves to carve, two on each side meeting on a point, and I did the whole thing in less than an hour.


On the last groove it was getting late and I was tired, but I wanted to finish this step. I paid for my impatience by slipping with the tool and scraping parts of the blade I didn't want to, resulting in scratches that are still there. But overall it worked quite well, and I won't do that next time!

My Final Project: Part II

Heat-treating has two parts: hardening and tempering. Hardening occurs when the blade is brought to a critical temperature (depending on the type of steel) and then quenched in a liquid in order to cool it quickly and form a rigid molecular structure. I was going to quench my blade in oil, which would cool it slightly slower than water in order to reduce risk of cracking or warping, but still fast enough to result in desired hardness. So, I made this quench bath by TIG welding some tube to a 1/4" steel base and filling it with canola oil.


The only certain ways of knowing whether a blade is at critical temperature are color and magnetism. Once the blade is no longer magnetic, the molecules are ready to form their rigid structure in the quench.


Due to the thinness of the blade, I had to correct many warps occurring from gravitational bending while holding it in the forge to heat it up. I learned that I had to rotate it often, as well as drawing it in and out to heat the blade evenly. Most of the process of forging a blade looks like this anyways:


When it was evenly heated to nonmagnetism, I plunged it into the bath amid a gout of flame! I had to be careful that it was pointing straight down and that I did not move it from side to side in the bath, as these would invite warping because of the uneven hardening of sides, like the warping of my shield with the glue. It also helped that I put a hot poker in the oil beforehand to heat it preliminarily; ideally, the oil is hot to provide for less shock in the quench, like using oil instead of water. Just another precaution.


After the blade was cool, I drew it out of the quench bath and scraped it with a file to see how hard it was. I couldn't make a mark!

Wednesday, April 27, 2011

My Final Project: Part I

Well, I'm making something called a schmalsax. "Schmal" means "narrow" in German, and "sax" (sometimes "seax" in English, after the Anglo-Saxon) is a knife carried by, apparently, most men during the so-called "Germanic Migration" beginning around the 4th century, and seeing use through the Caroligian Empire of the Franks and into the Viking age. It is where the tribal kingdom of the Saxons got their name, and still lives on in the northwestern German province of Sachsen.

Archaeological examples range far and wide in size, shape, quality, construction, decoration, and pretty much everything else. A few criteria are agreed upon, however, and those are these: the sax is an instrument of war, not a tool, and it was usually shorter than a sword but no less important. Many Frankish graves, like that of Clovis of the Merovingian dynasty (ancestor of Charlemagne), feature both a sword and a sax, indicating that a man of import would carry both, equally decorated. They are mentioned in Norse myth; one hero, Grettir the Strong, prefers his sax to his sword.

I made a narrow example called by some the "schmalsax" from a file, a piece of high-carbon steel, hardened, which I annealed to soften for working. I forged the tip and kept the blade a uniform width, only beveling one side on the sharpest edge of the anvil I could find. It took maybe four hours of hammering to get the blade-blank shape you see below:

This, above and below, is the view I assumed regularly, as checking the straightness of the edges and the uniform tapers is absolutely paramount when forging a blade. Mine had a very gradual but steady distal taper and little or no profile taper until the tip.

I drew a line from the center of the tang at the shoulders (where the tang and the blade meet) to the tip of the blade, and intended to use it as a general guideline for my bevel.

I assumed this position often as well, checking for the uniformity of my bevels from the belt grinder. Grinding took probably half as long again as forging, and I used belts of increasing grit, beginning with 60 and going up to 400.

The idea was to grind out the hammer-marks I accidentally made when forging, but in the end I had to keep some to keep from grinding the blade too thin.


I cannot say that this process is without spirituality; later that night I took the blade with me on a walk in the fields and sat with it stuck in the ground to absorb the atmosphere in its presence, and to pay homage to the earth from whence my material came.

Coming soon: handle design and heat-treat!

The Rest of the Class

Essentially, the rest of the class was spent making our own designs, and carving them as a large final project. Mine was this entirely original intertwined-beard-hair man, inspired by the general spirit of wise, old bearded traveling men or gods, such as Odin, who is sometime similarly


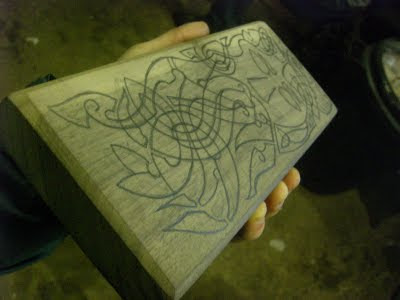
After the layout, I began to carve away the negative space, leaving my man and his hair-tangle flat.

After that I rounded it. This is so incredibly simple to explain, it feels, but it took my several days, with at least six hours of solid work in each day. It never felt like work, however, letting my muse drive me and the company of my fellows cheer me.

Later, I got to see some more of Owen's masterpieces, including this pattern-welded blade of otherworldly beauty:

This seax blade is beyond comprehension in its complexity and wonder:

The week culminated in Owen's annual Forge-In, where smiths and other craftsmen from all over the world came to talk, eat, exchange ideas, and do demonstrations of their craft. Once again, in an unbelievably short time, I learned an unfathomable amount.

One demonstrator was Leo Todeschini of Tod's Stuff, a jack-of-all-trades as it were, at least in the area of medieval crafts. Below is a 15th c. German knife called a bauernwehr he made, with scabbard and by-knife and fittings and blade and handle an all.

His demonstration was in scabbard making. He showed us to wet the leather, but not soak it, shape it roughly to the blade, cut it, sew it with waxed string and a thick needle, score designs with a razor and then amplify them with a hard but rounded piece of bone or plastic, and sew it all up. He added designs by scoring and deepening and also using little stamps he cut himself.

Another demonstrator was the supremely talented Petr Florianek of the Czech Republic. He demonstrated his carving with bone and antler, remarkably similar to ours with wood, but with a very differently grained medium. He used some chisels but primarily wielded the Dremel, and then rubbed his carvings with some kind of ochre to emphasize patterns.

One ongoing event which people attended and helped with as they pleased was the smelting of pig iron from iron ore by one Jeff Pringle, a talented sword- and bladesmith in his own right, and a veritable authority on Iron-age and Viking industrial techniques. He is a bladesmith with whom I hope to work this summer in Oakland, CA, where he and my uncle both live. I have known him for many years and he was actually the first swordsmith I ever met!

It was with a heavy heart that I left, but with a mind so full of ideas and a passion ablaze.

Wednesday, April 13, 2011

Carving: Day 2

On day two we met in the yard and by ten o'clock we were on the train to London, in order to visit the British Museum and the Victoria and Albert Museum, both of which have huge collections which concerned our work greatly.

This is a picture of Jake regarding a plaster cast of a doorway do the Urnes "stave church" in Norway, built of wood and intricately carved with curvilinear beasties, characteristic of this the twilight of pre-Romanesque Scandinavian ornamentation.

As we talked about the themes, motifs, styles and depictions, Jake also pointed out to us the marks of workmanship, and with out little bit of experience we could see how the wood had been carved.


This is the base of an Irish "high cross", showing influence of Viking and Anglo-Saxon ornamentation in its design, resulting from the Norse settlement of Ireland in the eighth through tenth centuries.


Below is a runestone of the blockier, swirlier, chunkier "Ringerike" style of Norse art, depicting intertwined dragons.


One find common in populated places which must have featured workshops are these so-called "trial pieces", pieces of bone or some other carvable material where craftsmen and students alike would work out patterns, practice techniques, and test new ideas, which we spent a considerable amount of time doing.


Later in the day we ventured to the Wallace Collection, still in London, which is one of the largest and most staggering collections of historical arms and armor in the world, predominantly blades.

The pictures below are both from there and from the British Museum. This first one is an Anglo-Saxon sword, probably pattern-welded iron and steel, although corrosion is not kind to ferrous metals. Most striking now is the bronze scabbard throat, wrought of bronze, most likely lost-wax cast by a Saxon craftsman.

These are some exceedingly beautiful bronze and gilded-bronze sword pommels. Their minute and exquisite workmanship puts them on par with the so oft-touted Irish metalworking like the Tara Brooch and the Ardagh chalice.

Below are iron Celtic swords of the continent, with beautifully preserved scabbards.


This is the exceedingly ornate boss of the Sutton Hoo shield, made of iron and covered with fine bronze foil, which was hammered by a master craftsman onto carved dies and then riveted onto the larger piece.
Blades from many periods and cultures congregated at the Wallace Collection, all with unique and equal beauty.