Saturday, December 1, 2012

Finishing a Sword and a Social Smelt

Warm from the friction of the tumbling media and wet from the water inside the tumbler, the guard and pommel emerged about six hours later looking like this.  I cleaned the grime off with steel wool, and can't pretend I wasn't enthralled with the warm, matte glow of the pieces.  They fit the blade perfectly, and it was time to think about finishing the blade and assembling it all. 


These same few days included a unique experience: a bloomery iron smelt, and a visit from modern English pattern-welding pioneer Mick Maxen.  The picture below is just a little sample billet of some of modern-style pattern-welding Mick excels at:


For those of you who don't know, bloomery smelting is an ancient method of iron-making out of iron ore that can be found in various earthly deposits, like black sand and so-called 'bog iron'.  It consists of a clay stack with forced air and charcoal for fuel, which burns continuously while the stack is charged with ore and its impurities, which separate, and the iron can be consolidated and used to make awesome things like swords and fire pokers and nails.  Here's a picture of our (11-kg?) bloom after it got smashed flat and cooled, chilling next to the compost in the kitchen:

Swedish magnetite smorgasbloom


I didn't get many pictures of the smelt itself because I was the one with the camera, and when I wasn't holding it I was definitely needed to do something!  Most of the pictures and blow-by-blow can be found here on Don Fogg's bladesmithing forum, well documented by Mr. Owen Bush, Esq., resplendent in his great overalls, for all the world like a kid playing Brio trains.  You know, with a 28-lb sledge and a two-hundredweight Alldays & Onions power hammer. 

Yesss.


Anyways, for some reason the only picture I got during that episode was this MySpace-style shot, complete with charcoal-nose and hardworking squint.


But enough of my emo-generation internet use.  Here's my sword after using some secret Owen-techniques to get the fit really perfect:


These are the components as permanent as they'll be before the tang gets peened over on the end, but they're more or less immovable.  No adhesive! 


I have not at any point brought up my fuller or anything that happened after the rough grind and heat treat to the blade.  That's for a few reasons: I ground the fuller completely freehand on a 1" contact wheel and it was one of the most nerve-wracking experiences of my life.  It still stresses me out to think about doing that.  The other reason is that, while I love the meditative state of hand-sanding the blade, it's dead boring to talk about.  I listened to a lot of Sunny Day Real Estate while I was doing it. So much '90s music that month. 


One last glamour shot in the sun, its last moment in naked steel before I fit it for a grip. 


Tuesday, November 27, 2012

Hilting, Real Blacksmithing, and Bone-Knowing

Hilting!  This where my years of reading about, dreaming about, and drawing swords started to come to the slightest amount of use.  I've always been drawn to subtle, sweeping lines and curves in swords.  The more practical, understated beauty of earlier medieval swords has always pulled at my fancy.  While I am deeply invested in the magical and alchemical processes of pattern-welding that were the hallmark of the semi-mythical legendary Age of Heroes, the Germanic Migration Period, I am also fascinated by the aesthetic of the later sword: monosteel, more mass-produced, less an object of adornment and symbol of wealth, but somehow more stripped down; in many ways more true.  It speaks of machines, of industry and war in a more direct and somehow equally beautiful way.  I wanted my first sword to be like this.


I write of a weapon that is supposed to look like it has been and can be used.  It is not a king's scepter; it is not a peasant's billhook.  It is a weapon and a tool of war whose aesthetic is meant to reflect nothing other than what it is.  It has grace, it has refinement, but only insofar as what does not inhibit it for what it is. 


The guard was forged of the same 1080 steel that the blade was.  There's no real reason for this; I honestly would prefer that I had made it out of a softer steel, so I could have engraved it or otherwise adorned it.  But I think that being trapped in hard, simple steel was good for providing me with creative boundaries to work with.


One great thing about forging this guard with Owen was that I was able to bear witness to his 17 years of blacksmithing experience, and not just his bladesmithing skill.  Blacksmithing is something that I honestly admire more than bladesmithing, though being a bladesmith is my current aspiration.  In comparison, a bladesmith's forging skill set is rather small and the dimensions in which he or she is required to think are very narrow.  The ability of a blacksmith to understand the material and its flow, the boundless opportunistic advantage-taking of angles and weight and heat, dealing with the vicissitudes of the material and tools: all these are a source of endless fascination and admiration for me. 


Owen was able to think about the stock in a way that let him map out, over several stages, the exact shape I wanted to create.  This understanding is something you can only build with common sense and sheer hours of doing.  Jim Austin, too, is a person I have spent considerable time with, simply mesmerized by his deep knowing of his tools, materials, and limits.

 A bladesmith and notable presence in today's movement is the young and very seriously talented Josh Burrell, a good friend of mine.  Josh is the son of a blacksmith and a jeweler, and has an organic and spiritual understanding of  craft that results from a lifelong surrounding by it and its love, and yet also requires a particular and special personality and intelligence.  Having both, his work is truly impressive, executed with skill, and filled with obvious love. 


There is a word I read once: bone-knowing.  This word  describes to me what comes with skill and patience and mistakes and despair and resurgence and hope and inspiration and hard work of learning a craft.  One of the reasons we learn craft is to feel this bone-knowing: to have a flow and harmony to our movements with our surroundings and our materials.  There is a song to work, sung by our bodies, our tools, our materials, and our souls.  We become a part of our workspace, our tools become extensions of our bodies, and we connect ourselves to our materials through the tools.  Our materials are of the earth, and when we join the song of craft with our bodies, our souls join with our work. 


The pommel, like that of everyone else in the class, was a drilled and drifted disc of round stock.  I had specific plans for my own, inspired by a Peter Johnsson pommel.  It was this sublime masterpiece:


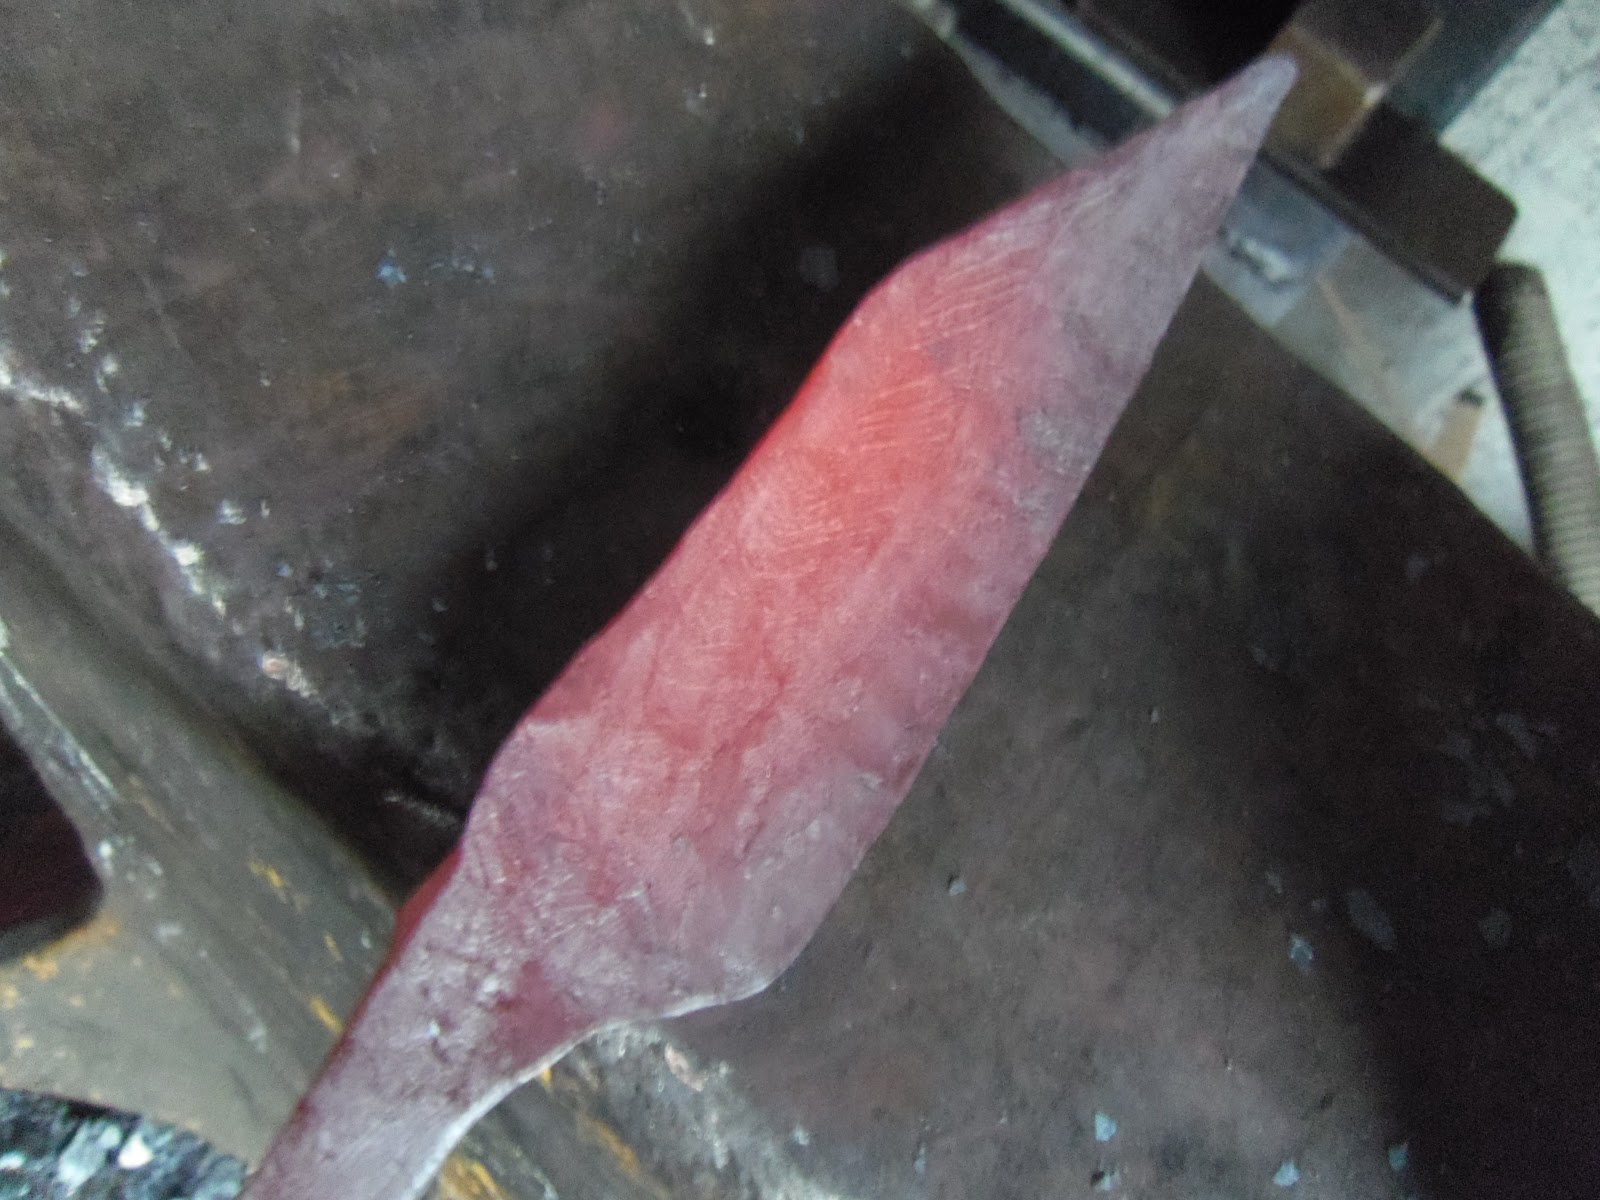
 Here is the guard as I work on the geometry under Owen's direction.  I wasn't referencing a particular guard, but rather imagining one in harmony with my blade.  My design comes from an archetypical understanding I have that comes from years and years of poring over pictures of swords, drawing swords, and voraciously internalizing and processing them.  I have so, so much more to learn, especially about how to look at swords and think about their components and proportions, but I have a sense of them, regardless of how true they are. 


What's interesting about this particular shape is that it's both common and beautiful.  Countless variations of it are extant on originals, and this means one thing: it's intuitive.  It's easy.  It's easily prepared for, and someone with a bit of a blacksmith's mind knows just how to tease the iron into that shape.  The earliest guards forged out of a single piece of iron are on viking swords, and take either the most simple cross shapes, slight curves, or else some early evolution of this shape (Peterson Types Z and Æ). 


The pommel's work was full of imagining radii and asymptotic curves. 


There was quite a bit of heavy grinding with the belt grinder on both, using a flat platen behind the belt for the outside curves and a contact wheel (generally 1") on all of the interior radii.  The pommel was tricky and hard to hold onto during that part! 


The fitting of the guard's opening from that point was refined with a dremel tool and little files.  That took quite a while, but I got it to a tightness with no wiggle or rattle, and it held itself on tightly by friction alone.  I was very happy with it!  You find yourself spending less and less time actually working on your sword as it nears completion, and with each new step in wieldability, you really just play with it more and more, making excuses to walk across the shop for a different tool and slaying invisible enemies as you traverse the concrete. 

One aspect of swordsmithing as art and sculpture I really want to branch out in is texture and finish.  Communicating to Owen the dull, matte look I wanted for the hilt components, he suggested I throw them in the tumbler for a few hours with bronze media to batter them all up and give them the warm, decidedly-not-shiny finish I was looking for.  Here they are in the barrel:


Finishing next!

Tuesday, November 20, 2012

Terrible Beauty: Grinding and Heat Treat

After that came the heavy grinding.  Grinding is the second most dramatic period of material change in a sword's creation, after forging.  

This part of making a sword is transformational: it is when, both physically and metaphysically, a sword becomes.  The black scale is ground away to reveal the sheen of steel, and in small but symphonic ways, weight is shaved off and a lean and slender blade emerges from the hunk of metal, like a statue being slowly rescued from its marble imprisonment by a sculptor. 

The lines drawn by the hammer will cut it while you are forging, and your eyes learn to correlate highs and lows and the hammer's footprint, finding averages and drawing fat marker-lines on your piece.  But that's only the beginning.  Even after one pass with a course 36-grit belt, it already looks more like a sword.


My sword-forgin' flannel and my sword-grindin' pants, which still have the hole I burned in them that day with sparks.

The beautifully bumpy lines you drew with your hammer now get leveled by a belt, becoming real lines.  You begin to see what is hiding in the steel, and it's exiting and scary and a little intoxicating.  It only gets more so, as the feel gets closer and closer to what's hovering above you in your artistic mind. 

Smeared with anti-scale compound for the heating before the quench.  Scale may form on some places of the blade, insulating it unevenly from the fast cooling of the quench. 

There is one stage that the blade undergoes during this process that happens both as soon as it can and as late as possible.  The heat treatment of a blade is something I have described already but will never stop learning new things about and finding that I was doing something wrong.  It's a very esoteric-seeming process of normalization/hardening/tempering/not ruining the temper.  The idea is to quench it when it's thick enough that you have to worry less about warpage, but thin enough that the whole blade makes the necessary changes all the way through and so that you don't have to do a ton of grinding at high speeds, when too much friction heat can ruin the temper if you are not careful. 


Owen has a classic horizontal drum-furnace outfitted with thermocouples and pyrometers to ensure the accuracy of his temperatures for the safe and consistent heating of blades to critical temperature before the quench in the heated tank of industrial quench oil nearby.  The oil is in a vertical tank and is heated from below with a torch.  The heating of the oil is important so as to not provide too great a shock for the dull orange blade that is quickly plunged into it vertically. 


After the blade has fully  cooled in the quench it is tempered in the same oven at much lower temperatures.  After each tempering heat is achieved, the blade hangs vertically once again, to reduce warpage due to uneven cooling.  The fragile tendency of a sword blade to submit to expansion and contraction because of thermodynamics, as well as the sometimes frustrating intrusion of gravity on hot steel, becomes a struggle, but the accuracy of using low temperatures and bending jigs means that you learn how to keep your blade straight as long as you grind evenly. 


My blade slimmed down into a very serious fighting machine thereafter.  Smiths often characterize the heat treat as the period when a blade becomes a blade, and after that it's all refinement.  While I believe in the completion and composition of a piece from an artistic perspective, complementing a sword with all its parts and accompaniment, it's completely true that at any point after the heat treatment, the sword can fulfill its intended purpose.  It's hard, flexible, and can be sharp and light and deadly.  The fact that we do not stop here takes it, for me, further away from a killing object and more into the art realm, but in beautifying it we are also further perfecting it, for so much of its beauty is in its perfection of what it is.

It is truly a terrible beauty.


Forging a sword (Type XIV)

After Owen's pattern-welding class came a brief hiatus during which I worked on another pattern-welding project, began to hone my grinding skill, and generally geared myself up for the major project of my stay: Owen's week-long "sword forging" class.  

He runs it about twice a year, check it out here: Owen Bush 7 Day Sword Course

The classroom.
 
The class itself meant a few things: it meant forging a single sword out of a single piece of steel, in what we generally think of as the "classic" or "basic" method of forging a sword.  In some ways, we have our generally non-analytical view of historical context to thank for this idea. Anyone who has delved into historical metallurgy knows that well into the "high middle ages", when we generally think of long, slim, shining monosteel (non-composite) swords, a huge amount of blades were still produced of non-homogenous, poorly refined steel and iron.


Owen began by forging a random variety of blanks for double-edged medieval European swords, according to the preferences of those taking the class.  Here they are, in 1080 steel, cooling from the initial forging.

It's true that more refined steels were used during that time, but the fact is that nothing truly as standard or predictable as modern Bessemer-process steels existed until the Industrial Revolution, and that all older steel, no matter how well it performed its use, was the product of pre-industrial craftsmanship and was, in many ways, unique.

The first exercise was to learn forging bevels on a double-edged knife, my first attempt at which is shown here.

But this was not an historical metallurgy class.  Anyone with that in mind should check out Owen's From Ore To Knife class (probably incredible).  This was a sword forging class, which was about process and product, technique, skill and style, and making something that was, in all identifiable respects, a modern sword.

We each chose a blank whose proportions matched the sword blade we had in mind.  I envisioned a 13th century English sword-and-buckler weapon, called by most today by its Oakeshott classification: Type XIV.


My tapered but un-beveled blank in a coal forge.

This was to be a short, broad cutting sword, with a long, tapering tip to allow for quite a lot of edge with lots of width to back it up: perfect for slashing, but with a long enough tip to pierce armor that had come more heavily into play during the 12th and 13th centuries, when this type of sword was popular.

Various scenes from the English I.33 manuscript, showing the use of a Type XIV with a buckler.


It represented the more conservative legacy of the Viking-type sword of earlier centuries: shorter and broader, squat of handle, broad and brutish, though still elegant in its way.  This is when swords branched off in the other direction, becoming longer and slenderer, starting with the Norman sword and eventually becoming the long, acutely pointed thrusting swords that characterized the High Medieval period. 


The use of this particular sword is most described in what is referred to as the I.33 manuscript.  It resides in the Tower of London, is German, and was written in Latin in about the year 1300.  It is the oldest surviving manual of Western martial arts, of which there are few compared to the highly traditional and well-documented and ritualized fighting system of Asia and India.


The sword blank after beveling the edges by using the hammer and the anvil face at specific angles to sculpt consistent planes.  There is much twisting and warpage that must be learned and counteracted, with also constant attention to keeping the steel both hot enough to work without cracking and not too hot so that the steel "burns" (carbon is burned out and the steel breaks down)

The general idea is the simultaneous use of a short, broad cutting sword and a small, brutal shield called a "buckler", which protects the sword hand from an enemy's blows and is also used as a bludgeoning weapon: essentially massive brass knuckles.  But steel.  

A photographic capture of "recalescence": thermodynamic change in steel's crystalline microstructure can be identified by regions of cooling and heating emanating from the metal. 

The fighting style itself contains a lot of grappling and trapping the enemy's blade.  There's twisting and trickery.  I believe it represents a sword of sub-knightly class of fighters, wealthy enough to afford a sword but not a horse: probably not professionals, but landowners with a stake in defending their property.  

The sword cooling vertically during normalization, a heat cycling operation to reduce stresses caused by heating and forging.  It's vertical so as not to warp it by lying it on a cold surface that would contract one side by faster cooling. 

Monday, October 29, 2012

Welling II: the Seax


I'll talk a little about the historical form of my blade now.  It's a seax, a single-edged war knife carried by any and all free men the Germanic migration period.  In some ways, it's really a symbol of that time and place: it represents the danger faced by the tribes who struck outward from their swampy homelands, the self-sufficiency and craftsmanship they were capable of, the fact that they knew what it would take to take what they wanted, and the fact that the power of freedom and personal choice were the utmost values of their society, at the possible cost of violence, and all with cold functionality and artistic flourish.

Classic Anglo-Saxon broken-back seax


The seax, as I spell here with the Anglo-Saxon spelling, refers to the particular weapon carried by men of the Angle and Saxon tribes of northwestern Germany, who migrated en masse to the British Isles in the 5th and 6th centuries AD.  "Saxon" itself is most likely a reference to the weapon (more generally spelled "sax" in reference to the Scandinavian and Continental flavors as well, and is the modern German spelling). 

A characteristic style of the Anglo-Saxon model is the "broken-back" design: thick spine, flattish grind, long and nasty point with a triangular cross-section, and almost axe-like cutting power, but with all the deadly "handleability" of a sword.  In many ways, the sax represents to informed bladesmiths today an historical sandbox of blade design and metallurgical techniques: there are so few parameters to what a sax is and such a grand and exciting variety of blade sizes, geometries, metallurgical compositions, patter-welding techniques (almost endless!), finishes, and beyond.  Therefore, a context-minded smith has great freedom in his design and boundless inspiration to choose from.  Some of my favorite museum pieces of saxes. 

A well-known beautifully inlaid Anglo-Saxon specimen

Anyone interested in saxes and their evolution must acquaint himself or herself with Jeroen Zuiderwijk.  Here is some of his extensive research, and a great source of knowledge and inspiration for smiths and scholars alike:
http://1501bc.com/files/information_about_saxes.zip

I have shown the construction and first finish of my sax. Here is my blade at that stage, after the final grinds and sanding:


It's hard to see at this point, but the blade's underlying pattern is visible in this polished state.  It's really just a matter of moving it around in the light, and a subtle difference can be discerned.  Some have argued that historical pattern-welded blades were finished like this and left as they were, with a polished finish and a very subtle revelation of pattern. 

However, they figured out pretty quick that anything acidic will eat steel and reveal the pattern much more dramatically.  Exposing steel to corrosion for aesthetic reasons is called etching.  This can be achieved with vinegars and natural acids, but for a bit more effect, modern smiths use more corrosive substances like ferric chloride (FeCl3).  Thirty seconds in a 1:1 water solution gives you this:


Once again, the differences in the steels' chemical composition is responsible for the dramatic contrast in the etch.  1080 is a simple steel, meaning it is almost completely composed of iron and carbon (about 0.8% carbon, pretty high), which here has etched dark.  The lighter one is 15n20, a similar steel but with a 0.2% proportion of nickel, lending it brightness.  These are both relatively simple steels that forge-weld well and behave similarly in heat-treatment, giving them good compatibility. 

This particular pattern: twisted bars and a high-layer piled edge is pretty well precedented in blades of this period and style, but probably more common in double edged swords.  Many seaxes probably sported equally striking but less complicated patterns.  One thing I love about the clipped cut on the broken-back seax is the cross-sectional view of the bars on the spine:


It's clear that the back bar is twisted more tightly than the middle, and has not been ground into as far.  The further you grind into a twisted bar, the closer you get to the star-pattern you see in the middle bar.  The outside of the twist looks like the diagonal lines of the back bar. 


The spine itself shows something of a gradient, from star to stripes, to show the different depths of my grind into the twisted bar.  There are incredible possibilities with pattern-welded steel, and I'm just beginning to explore them! 


Sunday, October 28, 2012

Welling I: Pattern-welding

It was as March began that I took my first steps into an art that will shape me for many years to come: pattern welding.  It's an historical process, determined by availability of materials, inconsistency of organically produced steels and their non-homogenous nature, and varying states and methods of refinement.  The process produced a blade of varying physical properties, metallurgical circumstances, aesthetic beauty, and general fascination.

I took a three-day course with Owen Bush, more or less the premier swordsmith of the United Kingdom, a vast base of knowledge and experience, authority on his ancestors' Anglo-Saxon seax, talented and dedicated artisan, and dedicated giver to the craft and community.  His famous annual hammer-in has provided an incredible forum for the informed bladesmithing community, as well as served as a crucible of ideas for the leading minds of the modern movement of swordsmithery. 

The basic concept of pattern-welding is the mixing of steels in a semi-solid state by forge-welding them to each other.  In preparation, different or similar steels must be aligned for lamination.  With modern simple steel alloys in alternating layers, I prepared these packets for forge-welding:


Forge-welding itself is a nigh magical process, essentially wizardry, in such a way that even our modern understanding of metallurgy, chemistry, thermodynamics, and physics cannot dim.  For those of you who are more curious about the specifics of pattern-welding, I will be explaining the individual steps further as I post works-in-progress.  However, Don Fogg's bladesmithing forum is an invaluable resource, and there is good information to be found here at patternwelding.info.

But back to the thrilling tale of molecular abomination: I donned these shamanic masks for the protection of my soul:


Almost all of my experience in forge-welding has been in a gas forge under a power hammer.  Many smiths would criticize me for such modern techniques; there is a sentiment that they distance one from the spirit of the craft.  I feel no shame, although I would like to take the time to experiment more with solid fuel forges and of course with hand hammering.  That is an argument I will save for a later discussion.  For my purposes, these tools serve me well and allow me to make what I want in a way I think is appropriate.

The bearded sorcerer at his black art with his hulking eldritch machines:


Owen and his apprentice Owen running the show:


Those two packets I showed in preparation above got forge-welded into billets, one of which was turned into the two twisted bars on top, and one of which was folded on the laminated plane multiple times into ~320 layers on the bottom.  The diagonals of the twist can be seen as an imprint in the black scale on the top two:


The reason it's visible is that the two different steels involved, 1080 and 15n20, have different oxidation rates and reactions, causing that layer of black rust ("scale"; oxidation caused by heat) to form differently over the different layers.  Rust itself, oxidation, is an inhibitor in the welding process (steel welds to steel, scale does not weld) and must be ground off of the surfaces to be bonded, looking like the shiny bar on the bottom.  Here is another shot of the twisted bar:


Those three bars above, two twisted, one folded repeatedly (often called "piled"), have been thereafter welded (from left to right) into the below blank.  The edge bar being on the right, the left top corner has been clipped off to ease the forging of the shape and result in minimal pattern distortion. 


Here you can see more of the pattern as I forged out the shape.  The visual difference here is not caused by scale but rather a difference in heat contraction speeds between the two steels as the blade cools in the air. 


This is the blade after a few more tweaks of the hammer and cleaning up the tang shoulders with a bench grinder:


After normalization (heating the blade and letting it cool to reduce stress of heating and forging caused by crystalline grain growth), I ground the seax to shape.  I used a 72" belt grinder and gave it a flat grind (triangular in cross-section.  After that comes what is called the "heat treatment": I  hardened the blade (brought to critical temperature and quenched to make a rigid but brittle microstructure) and then tempered it (brought it to a lower critical temperature and allowed it to cool slowly, to reduce brittleness while maintaining most hardness). 

Heat-treatment is an imperative step for all blades, not just pattern-welded ones.  However, that first step of normalization (to reduce blade stress and thus risk of cracking in the quench) may be even more important in pattern-welded blades owing to their theoretically equal but possibly less stable construction of multiple materials.  A smith must keep in mind the thermodynamic properties and behaviors of his different materials during heat-treatment and change them accordingly. 

After all that comes a finer grind with belts increasing in grit weight, and finally culminating in wet hand-sanding in a final, decisive direction.